Installation location
The NRT is designed, depending on the version, for installation in the car or as an emergency device for an enclosed lift lobby.
Mounting types / housing variants
Mounting the base unit behind the speaker grille of the COP
The base unit is mounted behind an existing speaker grill in the COP.
Mounting is done using the adhesive pad. Ensure that the mounting surface is clean and free of grease.
-
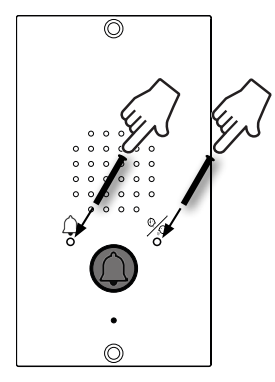
Remove the protective film from the adhesive pad on the base unit and position the device at the desired location. Then press the device firmly against the mounting surface for approximately 10 seconds.
-
Remove the protective film from the microphone and position the microphone at the desired location. Then press the microphone firmly against the mounting surface for approximately 10 seconds. Ensure that the microphone is placed behind an opening facing the car so that sound pickup is not impaired.
-
The microphone is equipped with a 30 cm connection cable, allowing flexible installation.
Mounting the base unit on the stainless-steel front panel
Article no. 602361 / 602363 / 602364 / 602370
The base unit is attached to the stainless-steel front panel using the adhesive pad. Ensure that the mounting surface is clean and free of grease.
-
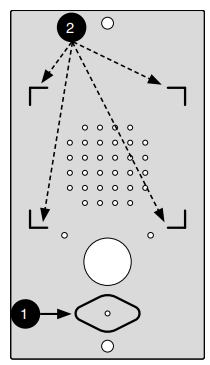
Two positioning marks (1 / 2) are located on the rear side of the stainless-steel front panels.
-
Remove the protective film from the adhesive pad on the NRT 1 XS and place the adhesive surface within marking (2). Then press the device firmly against the stainless-steel front panel for approximately 10 seconds.
-
Remove the protective film from the microphone and place the microphone within marking (1). Then press the microphone firmly against the stainless-steel front panel for approximately 10 seconds.
-
For stainless-steel front panels with pictogram indicators, two additional light guides are included. These guide the emitted light from the LEDs to the front of the stainless-steel front panel.
To install, press the light guide into the corresponding opening.
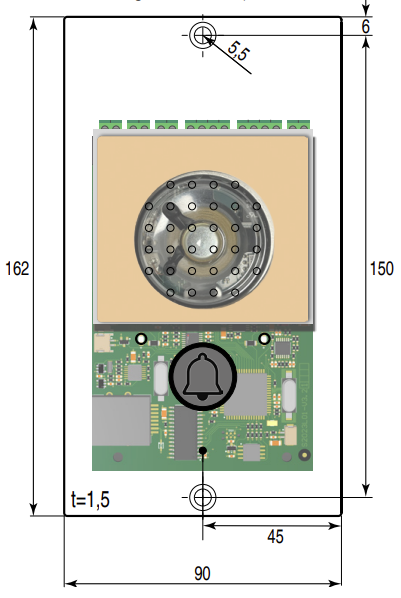
Dimensions of the stainless-steel front panels (external dimensions are identical for all panels)
Mounting the surface-mount frame
-
First mount the NRT on the stainless-steel front panel. For details, see:
Installation & Connection | Montage Grundgerät auf VA Blende -
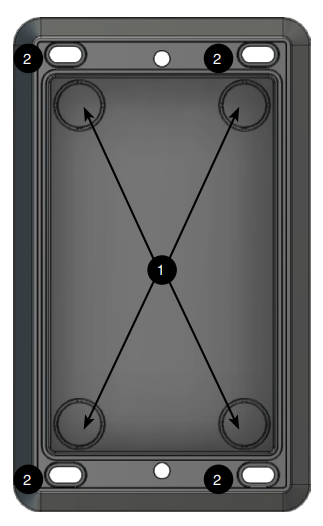
Feed the supply cable into the frame. To do this, break out one of the four cable entries (1).
-
Mount the frame on the desired surface using the four slotted holes (2)..
Important:
Screws are not included in the scope of delivery.
-
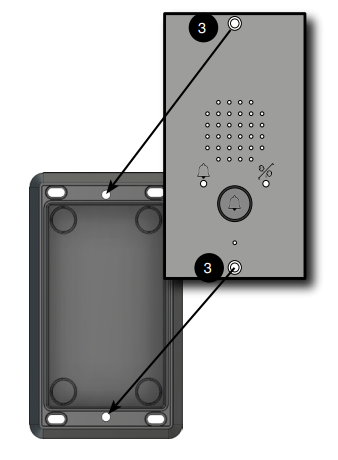
Place the stainless-steel front panel with the mounted base unit onto the frame, then fasten it to the frame (3) using the supplied screws.
Connecting the telephone line
Route the telephone line from the machine room through the travelling cable to the screw / plug-in terminal LINE and connect it to contacts A and B. The connection is non-polarised.
Connection example: Two NRT 1 XS on one telephone line:
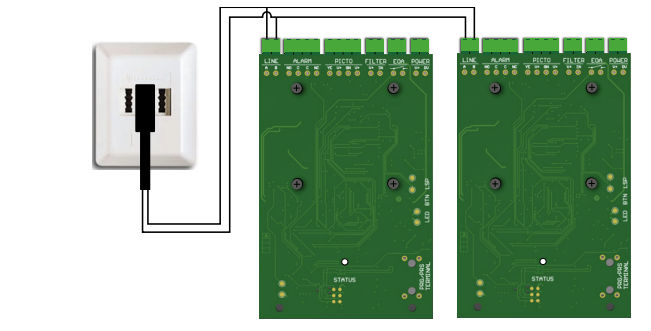
We expressly point out that the voice communication may be adversely affected if no separate travelling cable or no shielded pair within the travelling cable is used.